Pages

Wednesday, October 31, 2012

Guinea Surprise

We had a very eventful, guinea-filled weekend! Remember the photo of the broody guinea I showed you here? I was pretty sure her eggs weren't going to develop because I had seen her off the nest quite a bit and it has been getting really chilly at night lately. Well, I came home Friday and found this.


Every single one of her eggs had hatched! The keets all looked to be doing great and I was so excited when I saw them. Discovering unexpected babies in the middle of your back yard is quite the adrenaline rush. It was for me, anyway! However, we aren't really in the market for more guineas. We still have 13 of the original flock, plus 15 of their offspring (see them hatching here) and now these too? But one look at them and I knew we could make room for more.

 
With the temps getting close to freezing every night here now, we thought it would be best to bring the keets inside under a heat lamp. We marched out back to snatch up the keets, and the mom came at us! If you've never encountered a new guinea mama, it is quite shocking how aggressive they can be.

Guinea mom and dad protecting their babies.

We had to come back again armed with a rake and trash can (don't ask) and managed to get most of the keets gathered up. We decided to let the mama keep a few because we felt bad about stealing her babies and she wasn't letting us near them anyway. As of this morning three of the ones with the mama are still alive and following her around everywhere, so hopefully they make it. The 11 that we brought inside are doing really well and growing so fast. Luckily we have 20 acres so at least they have plenty of room to spread out!

~Tammy

Shared with Farmgirl FridayFarm Girl Blog Fest, Farm Photo FridayCamera CrittersWeekly Top ShotSimple & JoyfulYour Sunday BestBackyard Farming Connection HopOutdoor WednesdayEat Make Grow, Rural Thursday

Monday, October 29, 2012

Quick & Easy Fall Wreath

Inspired by a photo I saw in a recent Better Homes & Gardens magazine, I decided to make a mum wreath for my front door. We haven't done much in the way of decorating this fall and I thought this would jazz up the entry way a bit. First, I gathered my supplies - artificial spider mums, wire cutters, and a foam wreath.


I simply cut each flower off the stem, leaving about 1/2" to 1" so that it would stay in the foam securely and placed them all around the wreath.


The flowers on their own would be pretty enough, but I thought it would look even better if I added in some of my feathers I've collected (go here to see how I used feathers in the past). So after I had all the mums in, I placed some guinea feathers in between the flowers. Then, I secured the wreath to a long piece of ribbon I had in my craft bin, and hung it on the door.


I really like how it turned out. I think the dark spotted guinea feathers add nice visual contrast to the white spider mums. Even better, the total cost was under $10 and only took about 15 minutes to complete. Now that's my kind of project!

~Tammy

Shared with Mop It Up MondayTweak It Tuesday, Clever Chicks Blog HopBarn HopRepurposed Ideas WeeklyMix It Up MondayBackyard Farming ConnectionShare ItShow Me What You GotDown Home Blog HopCountry Homemaker HopCottage StyleTutorials & TidbitsEat Make GrowFarmgirl FridayThursday Favorite ThingsHome Sweet HomeCreative Things ThursdayOld Time PartySimple & Joyful, Sunny Simple Sunday

Friday, October 26, 2012

Feathered Friend Friday

A couple weeks ago, I shared the crazy night time routine of our chickens, so this week I thought I'd show you how the guineas prepare for bed.


There is definitely less squabbling and fussing in the guineas' night time routine. Instead of roosting inside a coop (which we tried to get them to do with no success), they roost high in a tree right beside the coop. It's kind of funny how some of them get up into the tree. Guineas can fly amazingly well, so some just fly straight up from the ground. Others like to take a tiered approach and jump up on the chicken run, then onto the metal carport, then into the tree.


Once they are up in the tree, they shuffle a bit to find a good branch, but it's typically pretty uneventful. However, when it starts to get dark, they do get loud and chirp quite a bit. My theory is that they are just talking to each other to make sure everyone is safe in the tree. Or maybe it's just because they like to make noise!

Thought I would also share this video of a scuffle I caught while I was waiting for them to head to bed. It was so funny how two of them were sparring and all the others were standing around egging them on (kind of like a schoolyard fight!). I was going to intervene, but it was over as soon as it started and was mild compared to other tiffs I've seen.


Never a dull moment with these animals. Between the chickens and guineas we have plenty of entertainment out here!

~Tammy

Shared with Backyard Farming Connection, Farm Photo Friday

Wednesday, October 24, 2012

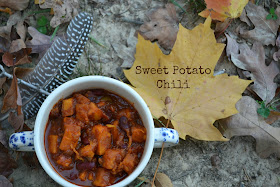
Easy Crock Pot Sweet Potato Chili

The weather here in Missouri can never decide what it's going to do. I planned to have chili last night and it was 80 degrees! I decided to pretend it was a frigid day (it will come soon enough) and warm myself with some of this sweet potato chili.


Sweet Potato Chili
Adapted from Carol Hee Barnett @ VegNews
Serves 4-6

Ingredients:
1 tablespoon olive oil
1 medium yellow onion, chopped
1 medium red bell pepper, seeded and chopped
1 large garlic clove, minced
1 tablespoon chili powder, or more to taste
1-1/2 pounds sweet potatoes, peeled and cut into 1/2-inch chunks
One 14.5-ounce can crushed tomatoes
One 15.5-ounce can dark red kidney beans, drained and rinsed
1-1/2 cups water
Salt

Directions:
1) Heat the oil in a large skillet over medium heat. Add the onion, bell pepper and garlic, cover, and cook until softened, about 5 minutes. Stir in the chili powder and cook for 30 seconds. Add the sweet potatoes and stir to coat with the spices.
2) Transfer the mixture to a 4 to 6-quart slow cooker. Add the tomatoes, beans and water, season with salt, cover, and cook on low for 6 to 8 hours.


The original recipe called for chipotle peppers added in just before serving, but I didn't have any on hand. I tried the chili first and it really needed some smoky flavor, so I added some dashes of smoked paprika. I also sprinkled on just a touch of cayenne for that great mix of sweet and heat. 


It hit the spot! I was going to make cornbread but instead just went with crackers so I didn't have to heat up the oven on this unseasonably hot day. We had plenty leftover to freeze, so I'll probably give it a rerun this winter with some jalapeno cornbread. Into the recipe folder it goes!

~Tammy

Shared with Hearth & SoulTasty TuesdaysShow Me What You GotMix It Up MondayMop It Up MondaysCountry Homemaker HopThursday Favorite ThingsCreative Things Thursday, Cottage Style, Eat Make GrowNatures Nurture, Snacktime SaturdayFarm Girl Blog FestFarmgirl FridayHome Sweet HomeWeekly Top ShotMeatless Mondays, Healthy Mommy Healthy BabyMelt In Your Mouth MondayOn The Menu Monday, Healthy Vegan Friday, Food On Friday, and Down Home Blog Hop

Monday, October 22, 2012

Clearing the Camera

I haven't done one of these posts in a couple months (go here, here, or here for a trip down memory lane) and had some photos stored in my camera that I wanted to share.

Broody guinea hen warning me that I'm getting too close to her babies!


Hope you enjoyed a slice of our homestead!

~Tammy

This post shared with Clever ChicksSunny Simple Sunday, Backyard Farming Connection, Weekly Top ShotOutdoor WednesdayAll Things FallThis Or That ThursdayRural Thursday, Creative Things ThursdaySimple and JoyfulFarmgirl FridayMop It Up Mondays and Homestead Barn Hop

Friday, October 19, 2012

Feathered Friend Friday

Welcome to our series "Feathered Friend Friday." Every Friday I write a post with interesting facts, photos, or funny stories about our chickens and guineas. If you need to catch up, you'll find all the Feathered Friend Friday posts here   

Last Sunday I spent a lot of time outside because fall had finally arrived. I was hanging out with the chickens for a while after I let them out of the coop, just watching and observing to make sure everyone seemed to be acting like their normal selves. I do this every morning just to be certain I can notice changes early on and detect if anyone has an injury or signs of illness. They all looked so pretty with the fallen leaves around so I had to snap a few shots.


I mentioned here that Buttercup had started molting a few weeks ago, but her molt has been very light. She really hasn't lost many feathers at all. Poor Jobin is another story. Here she is looking her beautiful, fluffy self last weekend.


And here she is yesterday, only two days after I first noticed feathers falling off her.


She only has one lone tail feather left (which I'm sure will be going soon) and her bottom, chest, and belly are pretty bare. She's in the porcupine stage of her new pin feathers just breaking through the skin. I've read this is painful for them, so I'm not petting or picking her up right now. It's pretty sad because she is visibly depressed at the moment. It happens with the heavy molters. They are in pain from the new feathers poking through and to make it worse, they look horrible, too! I'm going to be giving her some extra protein over the next few weeks to help her feather production along. She is going to look so gorgeous with her bright new feathers!

~Tammy

This post shared with Camera Critters, Farmgirl Friday and Farm Photo Friday

Wednesday, October 17, 2012

Exciting News!

This morning has been so exciting! I woke up to find that my interview with Gretchen was posted on her new blog, The Backyard Farming Connection. She started a series called Homestead Highlight and we were lucky enough to be featured as her first highlight! Please check out Gretchen's wonderful blogs and go here to read my interview about how we ended up where we are today.

As if that wasn't exciting enough, I got a Facebook message from Deb letting me know that I was the winner of her Autumn Notecard Giveaway! I won ten note cards with envelopes and she even gave me a nice shout-out here when announcing I was the lucky winner. Deb and her husband, Boz, are fabulous photographers and have more note cards for sale here. I am already planning out my "thinking of you" notes to send once I get my cards in the mail. Go here to check out Deb's fabulous blog!

And just because, here's a photo from yesterday. I passed this beauty on my way home and had to get my camera and drive back out to take her photo.


What a perfect autumn scene, right? I love fall!

~Tammy

This post shared with weekly top shot.

Tuesday, October 16, 2012

Spaghetti With Not-Meatballs

During the week I really don't feel like cooking dishes that take a lot of time. On the weekends, however, I enjoy trying out new recipes and spending more time in the kitchen preparing for the week ahead. Last weekend I found a recipe for vegetarian meatballs that I just had to try. Since I had plenty of time on Sunday, I decided to make spaghetti with these "not-meatballs." I made my own marinara sauce using this recipe, but of course jarred marinara would be fine as well.


Vegan Meatballs
Adapted from Ricki Heller @ Veg News

Makes about 24 balls

Ingredients:
2 tablespoons olive oil
1 large onion, chopped
2 garlic cloves, finely chopped
1-1/2 cups lightly toasted walnuts
1-1/2 cups cooked brown rice
2 teaspoons chopped fresh parsley
1 teaspoon dried basil (I used fresh basil)
1/2 teaspoon dried oregano (I used fresh oregano)
1/4 teaspoon dried sage (I used fresh sage)
1/2 teaspoon salt
2 tablespoons flour

Directions:
1) Preheat oven to 375 degrees. Prepare a parchment-lined cookie sheet.
2) Heat oil in a large frying pan over medium heat. Add onion and garlic and sauté until onions are golden, about 10 minutes. In a food processor, combine remaining ingredients and process until almost smooth. Add onion-garlic mixture and process until combined.
3) Using a small ice cream scoop or tablespoon, scoop out mounds of mixture, roll into balls, and place on cookie sheet. Bake for 30 to 35 minutes until tops are browned. Serve immediately or store in refrigerator for up to 4 days.

I love how the "meatballs" turned out. They were very crispy on the outside, but soft and fluffy on the inside. I have plenty marinara sauce and meatballs left so I'm thinking of making meatball subs later in the week.


Even if you think you'd still prefer traditional meatballs, I encourage you to give these a try. I think you'll be pleasantly surprised!

~Tammy

This post shared with Clever Chicks, Down HomeEat Make GrowFarm Girl Blog FestThursday Favorite ThingsCreative Things ThursdayTasty TuesdaysHealthy Vegan FridayFood On FridayMeatless Monday and Hearth & Soul

Monday, October 15, 2012

Hello Fall

We had a long day Saturday at a marching band festival (David's band won nine trophies!) so we both slept like rocks that night. The next morning I awoke and immediately was in a frenzy because I overslept about an hour and the chickens were still locked in their coop. I bolted outside to set them free, then came back in to feed the cats. I went back out after that to fill up the chickens' food and water, and stopped in my tracks.


Fall has arrived! While we were gone on Saturday, it was very windy and bright leaves had been blown off the trees, forming a blanket on the ground.


 Seemingly overnight, so many of the leaves had turned gorgeous, deep shades of yellow and red.


When I came back inside, full of energy after getting my fill of fall color, I woke David up and excitedly said, "Look outside!" and he agreed it was gorgeous. I've always loved fall, but living out in the woods being surrounded by nature's beauty makes me love it even more.


Looking at the beautiful scenery right outside my door I couldn't help but be overwhelmed with a deep feeling of gratitude that this is the view I get to wake up to each morning. Sometimes I still think, "Seriously? We get to live out here?!" I'm so very thankful that we are living the life we imagined.

~Tammy

This post shared with Barn HopSunday BestSunny Simple Sunday, Weekly Top Shot, Country Homemaker HopSimple and JoyfulHome Sweet HomeRural ThursdayFriday Thoughts and Down Home Hop

Friday, October 12, 2012

Feathered Friend Friday

Welcome to our series "Feathered Friend Friday." Every Friday I write a post with interesting facts, photos, or funny stories about our chickens and guineas. If you need to catch up, you'll find all the Feathered Friend Friday posts here   

Have you ever witnessed the activity that takes place when chickens settle in for the night? I remember back when I observed our chickens' first nights in their coop and I was shocked at the ruckus. It is not a calm event, let me tell you!


There's a lot of noisy shuffling, pecking, jumping and biting while they all try to get their favorite spots on the roosts. You can really see the dynamic of the pecking order at nighttime.


Our head rooster, Cam, is usually at the highest roost right in the middle surrounded by his harem. The girls fight for spots next to Cam, with the older girls usually winning.

Cam wouldn't stay still!

Isis, one of the new pullets, has a really funny tactic on the roost. She basically buries her head underneath the chicken next to her. Maybe so she won't be seen and outed as one of the young girls all up in the old girls' territory? Not really sure why, but it's pretty funny.


I used to worry about them at night and felt bad for the ones who were forced to the less desirable spots on the roosts. Now I realize it's just a normal part of their nighttime routine and it's usually pretty funny to watch and see who ends up in the prized spots snuggled up next to Cam.

~Tammy

This post shared with Country Homemaker Hop, Farmgirl Friday and  Backyard Farming Connection Hop, Raising Chickens Link Up

Tuesday, October 9, 2012

Carrot Soup With Miso

Now that fall is here and we're stuck in a cold front, soup is back on the menu in full force. We have our old standbys and favorite recipes that I reprise this time of year, but every now and then I get the itch to try something different. Recently I was searching some of my favorite food blogs for new soup recipes to try and this one really caught my attention.


Carrot Soup with Miso and Sesame
via Smitten Kitchen

Ingredients:
2 tablespoons olive oil
2 pounds organic carrots, peeled, thinly sliced
1 large onion, finely chopped
4 - 6 garlic cloves, peeled and smashed
1 tablespoon grated ginger
4 cups vegetable broth
1/4 cup miso paste (I used red miso)
Drizzle of toasted sesame oil
2 scallions, very thinly sliced

Directions:
Heat oil in heavy large saucepan over medium heat. Add carrots, onion and garlic. Sauté until onion is translucent, about 10 minutes. Add broth and ginger. Cover and simmer until carrots are tender when pierced, stirring occasionally, about 30 minutes.
Puree soup in batches in blender, or all at once with an immersion blender. In a small bowl, whisk together the miso and a half-cup of the soup until the lumps are gone. Stir the mixture back into the pot of soup. Taste the soup and season with salt, pepper or additional miso to taste.
Ladle into bowls and garnish each with a drizzle of sesame oil and small mound of scallions.

I just realized that I forgot to add a drizzle of sesame oil at the end! Even though the soup was delicious, I think the sesame oil really would add something special.

If you aren't familiar with miso, don't let that scare you away! Miso is a fermented paste made typically from soybeans and contains all of the essential amino acids, making it a perfect complete source of protein. It is believed to aid in digestion and strengthen the immune system, among many other health benefits. And it will last forever in your fridge - I bought my tub of miso last winter and it is still good.


I found that a small bowl of this soup with a few crackers on the side filled me up but didn't leave me feeling full. The miso paste really adds a depth of flavor and richness to the soup, along with a nice salty flavor. If you've never tried miso before, this would be a great introduction to the super food!

~Tammy

Shared with: Hearth and Soul, Clever Chicks, Down Home, Thursday Favorite Things, Rural Thursdays, Eat Make Grow and Farmgirl Friday blog hops.

Monday, October 8, 2012

Old Ladder Turned Display Shelf

I picked my grandma up last week for a family get together, and I arrived at her house pretty early. We had some time to spare, so I did what I so often do at grandma's when I have extra time - I browsed the attic!

Lucky for me, grandma has always been sort of a pack rat (I'm sure that's where I get it) and her attic is filled to the brim with so many treasures. She hates to throw things away because she has a memory attached to nearly every item she owns.

This time exploring the attic I found a fantastic old ladder. Grandma said it was the ladder on bunk beds that my dad used growing up. How sweet is that? I love when an item has a story behind it (I suppose I get that from her as well).


I decided to make a display shelf out of the ladder. I simply leaned it up against the wall and grabbed items I had elsewhere in the house to fill the "shelves."


Our rose bushes are still kicking, so I cut one of the roses off to place on the shelf for a bright pop of color.


For the bottom two shelves, I draped my BHG magazine over one of the rungs with a framed picture my grandma gave me after I took the ladder off her hands. I had to add my little piggy bank on the bottom! We put all our spare change in him. He has a guinea feather for no reason, really. Just because I have so many feathers laying around I want to display them however I can!


I really like how this turned out. The spot over by my closet was looking pretty bare, so this filled it perfectly. I'm sure I'll change out the items from time to time to give it an updated look. Can't wait to decorate it when the holidays roll around!

~Tammy

This post shared with:


The Chicken Chick
Photobucket
The Morris Tribe Blog Carnival


Blogfest

The Shabby Nest


Also shared with Repurposed Ideas Weekly Creative Things Thursday, Tweak It Tuesday